|
An interesting aspect as to the
differences in the cutting methods used by the marquetarians in
the UK and those marquetarians on the "other side of the pond"
in the USA has been brought to light recently from within the
friendly environs of our Redbridge Marquetry Group.
The cause of this interesting debate and the ensuing
observations was due to the introduction to our group of a
review copy of Silas Kopf's excellent "The
Master Techniques of Marquetry" DVD. This DVD, (which
was produced in the USA) has been circulating among the members
of the Redbridge Marquetry Group recently and it has inevitably
brought to our attention the subject of the differences in
thickness between the USA sourced veneers and the veneers we use
here in the UK.
This perceived difference is that the USA veneers are twice the
thickness of the UK veneers (1/32 or 1/28th of an inch USA -
1/64th of an inch UK). That difference in the thickness of the
veneer stocks obviously obliges us both to use different cutting
methods due, primarily, to the added difficulty of attempting to
"blade" cut veneers at 1/28th of an inch thick that are
stinkers to cut when they are only 1/64th thick!,
I'm sure you'll appreciate the problems involved.
|
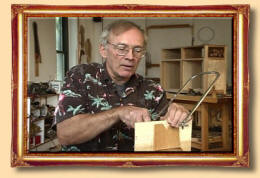
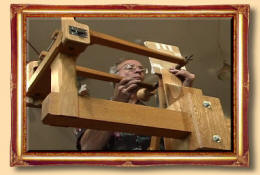
Silas uses a
"frame" saw with a foot operated
clamp system to hold the work in place
|
To illustrate those different cutting methods we are
including several clips taken directly from Silas's DVD
along with some photos of our RMG members hard at work with
their 1/64th inch thick veneers and using their trusty
scalpel blades!
In this first "clip" you can see Silas using a standard
"frame" style of saw and blade. It's actually much the same
type of tool as you will see our Alf Murtell using in his
piercing saw tutorial.
As Silas is a furniture maker he
generally uses packs of veneers, (often up to ten veneers in the
pack) in order to ensure consistency of design when multiple
marquetry inserts depicting the same design are required for a
piece of furniture.
A very important tool that's being used
by Silas in this photo is a foot operated clamp, of which you
can see a detail below.
|
|
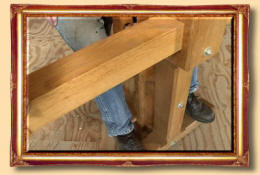
Silas operates the clamping system by opening and closing
the clamp by just pulling the foot bar towards or away from
him.
This method leaves both hands free to
use the frame saw without restriction and to manipulate the
veneer pack as required.
The clamp system Silas is using is
obviously a large piece of equipment and would necessitate a
decently sized work shop. If you are limited with your space,
you could use the arrangements that you will see our Alf using
in his piercing saw tutorials.
|
|
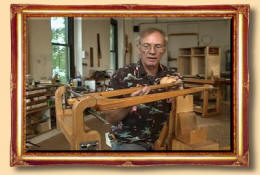
This
is a parallel cutting saw arrangement that
will cut at 90 degrees to the veneer
pack |
The saw you see Silas using in this photo runs on an
arrangement of "slider" bars that ensure that the saw blade
will cut the veneer pack (of perhaps ten veneers or more) at
an exact 90 degrees to the face of the pack.
This will ensure consistency of the cut, right through from
the veneer at the front of the pack, on to the veneer at the
rear of the pack.
When the cut pieces are assembled in the
projected design there will be a uniformity achieved with this
cutting method that would not really be possible with blade
cutting.
So, for a repetitive pattern or design
needed for furniture decoration, this cutting arrangement could
not be bettered (unless you are using a laser cutter of course!)
|
|
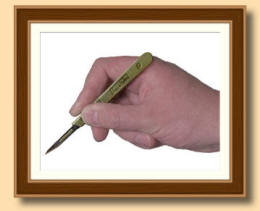
As you will see in the picture on the right, the standard method
of veneer cutting in the UK is to use the blade or scalpel
method.
This style of cutting works well enough with our 1/64th of an
inch thick veneers, but with the USA veneers at 1/28th & 1/32nd
of an inch thickness, you will find that the blade would be
difficult to control properly.
The thicker veneers will "catch" the blade of your scalpel so
much that you will find yourself yearning for the ease that saw
cutting would promise you.
|
 |
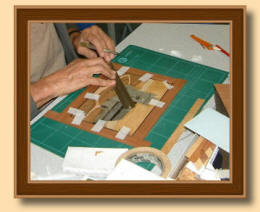 |
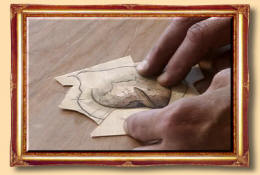
This photo shows a picture being cut with a scalpel.
A steel rule is being used for achieving
a clean straight cut across the border mitre.
Because 1/64th inch thick veneers are
used, a certain amount of spontaneity is available to the
marquetarian that is only really possible with the freedom of
blade cutting.
With saw cutting the design has to be
drawn on to the veneer so that you have a guide line for the saw
blade to follow.
Scalpel cutting does allow the "spear
point" arrangement which is used for "blending" one veneer into
another. Saw cutting would rather preclude this method.
|
|
In this photo on the right you can see Silas using the
"parallel" saw on a veneer pack.
This saw uses the same clamp arrangement
that we saw Silas using with his hand held frame saw.
On the next page you will see some
examples of the veneer packs that Silas assembles for use with
this parallel cutting saw.
You will also see some of the completed
marquetry designs - and - especially for my own personal envy -
that wonderful old Leviathan of a press that Silas uses. It's a
superb piece of heavy engineering!
|
 |
|
In the above you will have seen the main
differences demonstrated concerning the cutting techniques
required for dealing with the variations of veneer stock found
between the USA and the UK.
Those saw cutting techniques have the
inbuilt advantage of accurate packet cutting which guarantee you
a uniformity of repetitive pieces that it would be extremely
difficult to replicate with the scalpel method.
On the other hand, as we said earlier,
you do have the freedom to perform spontaneous cutting with the
scalpel blade that, in itself, would not really be possible with
the saw methods. As you see, both methods have their own
distinct advantages and disadvantages.
|
|
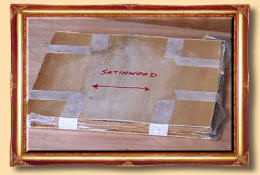
One further advantage with those thicker veneers is that you
will stand less chance when doing your "finishing" of
"rubbing through" your pictures' veneers into the base board
as often happens with our thinner veneers, and, oh! what an
awful sinking feeling that gives you when you see all your
hard work disappearing in a cloud of sanding dust!
The photo on the right shows a veneer pack assembled
together ready for the design to be placed on it and then
'cut out'.
Between some of the sheets of veneer a
few pages of waxed paper have been inserted in order to
lubricate the saw blade. It's much the same approach as we use
when we dip the tip of our cutting blade in a piece of wax to
lubricate the cutting point to avoid the "pulling" of the blade.
|
 |
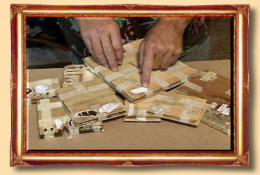 |
A series of "veneer packs" with the various parts of the
design placed upon them have been assembled ready for
cutting.
The packs have had "pilot" holes drilled
in them at strategic positions in order to facilitate the
insertion of the thin saw blade.
Each pack contains a different variety
of veneer which, when each cut piece is assembled, will supply a
specified amount of pre-cut items that will fit neatly and
uniformly into the main body of the work, thus ensuring a
continuity of design across the final project.
|
|
In this photo you will see that Silas is building up the
design of a Lilly using single sheets of the thicker USA
veneers together with an electric "piercing" type of saw.
Unfortunately with the saw method you
are rather prohibited from using the "window" method (which we
favour for our blade cutting techniques). Obviously, if you so
desired, you could make an attempt at the window method with the
saw, but I rather think that the saw blade would very easily cut
through your window veneer as well as your "insert" veneer
without "batting an eyelid" if you allowed it to!
|
 |
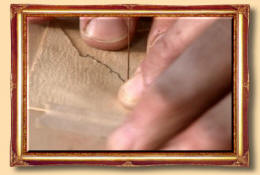 |
Here you see Silas using the saw blade to cut an intricate
part of the design.
The blade follows the pencil line with
great accuracy. It also gives you the added advantage of being
able to cut through two adjoining parts of the design veneers at
the same time and thus ensure a perfect fit when you join the
veneers.
As you see here, the blades used for
these saw cutting techniques are almost like fine wires. They
are of a thinness that allows you to cut your veneers with great
accuracy.
|
|
The finished Lilly placed in it's well selected backing
veneer.
Although no blade cutting was used - or
no "window method" - you will note that the cutting is very
clean and the veneers have none the less, blended extremely
well.
I have come to the conclusion that there
is a lot to be said for the saw cutting methods used in the USA.
As you see here, they can produce some excellent results. I
think it would be nice to see what would happen if both methods
were used on one picture - that would be very interesting!
|
 |
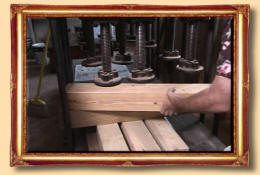 |
Well, we couldn't finish this piece without giving you a
view of Silas's press.
What a monster of a press this is!
How many of us marquetarians would love
to own such a superb item of machinery? I bet this couldn't half
produce some tonnage of pressure - and look at the bed size of
the beast - what dimensions of picture could you place in that I
wonder?
|
|
We hope you have found this article interesting. It highlights
an obvious difference in the marquetry techniques placed upon
the marquetarians who reside in different continents and is due
solely to the basic thickness of their veneer stocks.
As we said earlier on in this article, both cutting methods have
their own advantages and disadvantages - so, ultimately, the
choice of cutting is yours!
We would like to take this opportunity to thank Mr Silas Kopf
the owner of "Silas Kopf Woodworking" for his very kind
involvement in allowing us to publish these excerpts from his
DVD
"Silas Kopf Woodworking" manufactures bespoke furniture and
their web site is well worth a visit at:{
http://www.silaskopf.com }
I would thoroughly recommend Silas's "saw cutting methods" DVD
entitled "The Master Techniques of Marquetry" as an object
lesson in how saw cutting should be done.
There is only one small restriction for UK residents and that is
that the DVD is in the USA "NTSC" format and may not play
properly in some of the early DVD players - however, if you have
a computer with a DVD player in it, it should play perfectly in
that.
All the photos in this article are taken directly from the DVD
with no other intervention save for the gold frames, so you can
see how good the actual visual quality of the disk really is -
and the sound quality is also of that same high quality!
To order the DVD just visit the
{"SilasKopf"} web site as shown above for further details
|
|
Tutorials Menu
|

