

|
Flattening Warped Veneers by Alf Murtell |
|
|
I am sure that some of you at some time or the other have come across veneers that have been badly buckled, for example, something like this (hands round a piece of buckled Walnut Burr) or this (hands round a piece of badly buckled Ash) With a slight buckle you can get away with just dampening it slightly and then putting it under a press and the next day you should have a flat veneer, but that’s only for veneers that have been slightly buckled and, this way I’m going to show you tonight is to do making up a mixture of methylated spirits, flour, glycerine, Cascomite, and water. Here are some lists that have been made of the ingredients required and their measurements so, help your self to a list when you want one (it's also available at the bottom of this page) - and, that’s what the mixture looks like when it’s made up (shows audience the mixture) I’ve only made up a little drop because you can’t make up a load and save it, it won’t work, you just use enough for the sheets of veneer that you want to do. |
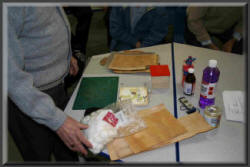
Alf lays out the materials and
equipment |
|||||||||||
|
So, the first one I used was this piece of Lacewood, I dabbled it and there’s the answer, - and the same with this piece of Maple, - there’s an example of the Maple very badly buckled, - and there’s the finished thing! Burr veneers are very bad for buckling, it’s a very soft wood and they’re so expensive Burrs, somewhere in the region of about £6.00 or £7. 00 per square foot, - and, it is a growth that is on a tree and it only comes in leaves of about two to three foot square so, it’s not like the leaves of veneer from an ordinary tree where it comes in lengths of about 6 – 7 – or 8 foot long, and they are very soft (the Burrs) and they buckle very easily. Of course, once you’ve treated them you’ve got to keep them flat, otherwise you’ll be back to square one again, they’ll all be buckled again, so, do try and keep your veneers flat, keep them between boards or something of that nature. These are some examples of Burr veneers that have been treated, and, there is a very ancient piece of wood, Green Cypress Burr, you won’t see much of that nowadays, so, it’s got a nice green colour there! But, unfortunately you’ll find it’ll go brown once the light gets on it Question from the audience: What’s it like to cut once it’s treated? Alf: Oh it’s easy enough to cut, but it soon loses its green effect, it’s like Magnolia, Magnolia is a nice green when you first get it but, once you make it into a picture and it’s hanging on your wall it goes to brown and you lose your green effect and it is then totally lost. Anyway, there’s a piece of Magnolia – so, everyone okay on that so far? any problems? No, okay, |
||||||||||||
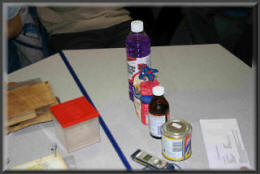
A closer view of the
materials required for |
Well, I can’t do everything tonight due to the time factors involved, but I can show you how we proceed with it, Right, we will say we want to straighten this nicely warped piece, mix up your ingredients and with a piece of cotton wool rub it well and truly into the veneer. I’m not going to use a press to put it in tonight, so, you’ll just have to accept the situation and assume that I’ve used a press on it. There’s nothing difficult in applying that mixture, so, do the same to the other side of the veneer There we are, we’ve now done both sides of the veneer with the solution and we’ll let it rest for five minutes – wipe off any surplus moisture and place it between two pieces of plastic sheet (a cut up supermarket carrier bag for instance if it is one of the un-printed type, otherwise you will need to be careful, if it’s a printed one, that you do not place the printed side of the plastic against your veneers, because it is possible for some of the print to come |
|||||||||||
|
away and adhere to your veneer, so, do be
careful when using those printed types of plastic bags) in this
particular case I’m using plastic A4 pockets or folders, put it
in them like that and place it in the press or under a heavy
weight or whatever you’ve got. Now, here’s a good example of this, you’ll see that Eric’s got a piece of Masur Birch veneer he wanted to use in his picture but it had buckled very badly (the veneer not the picture of course!) and we are going to see how the use of this method eventually improved it for him. Eric made up the mixture in the manner I previously described and treated the veneer. He placed it in a press and left it in his shed overnight (that particular night being one of those frosty ones we’ve been having lately) – he checked it the next morning and found that there had been hardly any reaction. He applied a second coat, but this time kept it in the house in the press, the following day he checked and found a flat piece of veneer. This proves that the process should therefore be carried out in a warm atmosphere. Eric has kindly brought the piece in to our group meeting for us to inspect and hopefully gain some benefit from his very useful experiments. This little flower press you see here may be of some interest to you, I did this one yesterday so I don’t know what it’ll be like (removing example from the flower press) but you don’t have to go to this extent, you can make one if you want to, but this sort of press is only suitable for pressing veneers, it’s not suitable for pictures, it’s only meant to be a flower press actually, ah! there we are, yes, there it is straight out of the flower press, not at all bad, okay? |
||||||||||||
|
Question: What level of mixture can you use? Alf: Don’t overdo it, don’t make too much mixture because it’ll only go off if it’s not used and will be no use to you Question: Where can you buy Cascomite? Alf: Well, Cascomite or Extramite, they’re a white powder type of glue that you mix with cold water – you could try Homebase or B & Q’s they may well stock it. You can also buy them by post from Axminster Tools. Question: How much do you use, a teaspoonful or tablespoon perhaps? Alf: It all depends on how much you are going to make up – the recipe states one measure, but don’t overdo it, alright? Question: Do you use plain flour or self raising? Alf: Only if you want it to rise and you’re making a cake!! |
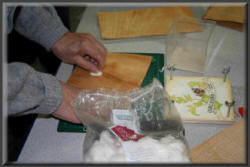
Alf applies
the "flattening" mixture to a piece of |
|||||||||||
|
Question: Will the application of the solution affect the colour of the wood? Alf: No, this piece of Green Cypress Burr that David gave me last week hasn’t altered one little bit – and all these are just the same – in fact this is a piece of Maple Burr and it’s still the same colour – it does not discolour the veneer Question: Once it’s treated how long does it last? Alf: Well, once you’ve treated it you need to look after it, you should keep it altogether flat, I know it’s not easy to do this, I’m afraid that I do it myself, but if you let it go you’ve got to do it all over again Question: After you’ve treated it does it make it harder to cut? Alf: No, no, it still stays the same and cuts as before, okay? Question: I wonder if the flattening treatment would preserve the colour Alf? Alf: It could preserve it, the only snag, as I said earlier on, is that once light gets to veneers such as Magnolia, it starts going brown and instead of being a nice green, it ends up with being a colour like that (a murky brown) or even a bit darker than that. You’ve got a nice green there and you think “oh yes, that’ll look nice in a picture” but, once the picture is hanging up on the wall you’ll find the green will start turning to a different colour. The ultraviolet rays start getting on to it and it’ll start going brown. So, that’s one of the snags with Magnolia and others like that |
||||||||||||
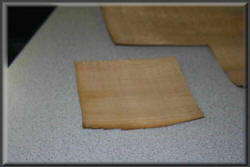
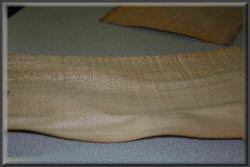 A nicely warped and buckled veneer example |
Question: The thing is with that process, you’ve filled the grain really so that may preserve the colour Alf: Yes it may but, I’m afraid that I don’t know at this juncture – but anyway, you won’t see much of this Green Cypress Burr anymore, it’s practically out of existence. Oh, talking about Burrs, if you hold it up to the light you’ll see loads of holes in it, so you’ve got to do a lot of repair work on it before you put it in your picture. You’ll need to cut pieces out and stick them in there. I mean these Burrs are mostly used on panels and furniture, that sort of thing, as I said, they are very expensive if you want to buy a piece of it, but the veneer merchants they have to go to town on it filling in holes and whatever before they can even work on it. I mean, if they had a piece like that, I know there’s a big hole in it, what they would do, they would get a veneer cutter or specially shaped punch, and cut that out and get another leaf of this Burr cut or punch another piece the same as that hole then insert it and you wouldn’t see the difference. |
|||||||||||
| The veneer cutter/punch is a type of hollow punch with a specialised cutting shape arrangement on its veneer “contact” face, and you have to use a hammer on it and hammer it down so that it cuts out the exact shape and then you can put it in the corresponding position on the faulty veneer. Oh yes it’s definitely an art on its own, I mean look at that piece there and note the figuring on it, for showing something like clothing, well there’s plenty of ideas in that piece, that’s the thing. | ||||||||||||
A flattened,
once previously warped and |
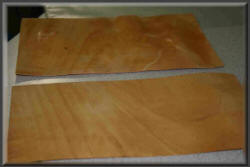
A warped &
buckled example at the rear and a |
|||||||||||
|
Question: you mentioned about the flower press being only suitable for small pieces, could you make a longer press by using an extended press with G clamps in the centre Alf: Yes, but you should not put full pressure on straight away, give it low pressure for the first twenty five to thirty minutes and then after that period you can put full pressure onto it. But these small presses are no good for pressing a marquetry picture with, the boards are too flimsy for such purposes. When I talked about Cascomite a little earlier, this is the ideal glue for laying pictures, its ideal. But you have to have a press for it, you just can’t put it down and leave it, you’ve got to put it into a press. As I said earlier, don’t make up too much of the mixture, it’ll only get wasted, as you saw, I used some for the demonstration and I’ve still got some mixture left even now Question: is it the meth’s that evaportates? Alf: It could well be – but, just to prove how good this method is – David will remember how bad these pieces of veneer were when he gave them to me two weeks ago to prepare for this demonstration – Dave, how bad were these pieces? David: Bad, they were very bad Alf: Well there you are that’s the finished article, not bad, eh? Question: How do you dispose of any mixture left over? Alf: You use your common sense and dispose of it in an environmentally correct manner – but if you only make up enough mixture for the job in hand you shouldn’t be left with any disposable quantity remaining. Question: Does it have a shelf life – can you save it? Alf: No, as I said, only make up sufficient for your immediate needs, any further questions, no, well, thank you for attending this demonstration. End of Demonstration – Thanks Alf. |
||||||||||||
|
||||||||||||
| Tutorials Menu | ||||||||||||