|
Tunbridge Ware by Alf Murtell |
|
|
First of all I
would like to thank our Redbridge Group’s Stan Wiskin for giving
us the opportunity to do this demonstration on Tunbridge Ware,
he has very kindly loaned us the samples we are about to use and
without his help this demonstration would not have been
possible. |
 Alf prepares to give the tutorial |
||||||
|
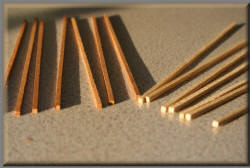
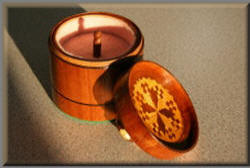
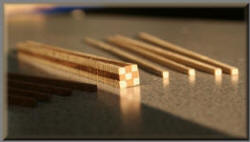
It then so happened that an apprentice of the J. Burrows company, well, he left them and took his knowledge with him and consequently passed it on to a cabinet maker who went by the name of George Wise and who lived and worked in the town of Tunbridge Wells and this is, not unsurprisingly, how the title of Tunbridge Ware came into existence. Well, that basically is the condensed history of Tunbridge Ware’s birth so I will now try and give you some idea of the processes used in its making. Stan Wiskin has used a band saw to cut up these pieces of wood we will be using for this demonstration – in this instance he has used Mahogany and some dark Ash, and he has cut them at 45 degree angles on his band saw to form long strips of wood with a diamond pattern cross section. He repeats this same process with his whites, as you see with this light Ash, then he glues those two pieces together along one straight edge to form a sort of “V” pattern, such as you’ll see in the central photo (titled: separated pieces and joined in a V shape) shown below. |
|||||||
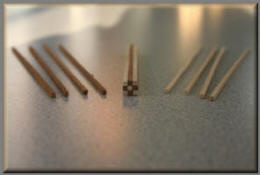
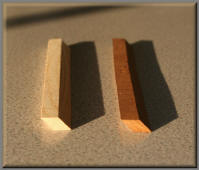 2 x 45° cut diamond section strips |
 Separated pieces and joined in a V shape |
||||||
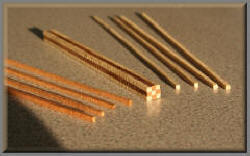
 8 x 45° strips glued into pattern |
 An assembled section & the component parts |
||||||
|
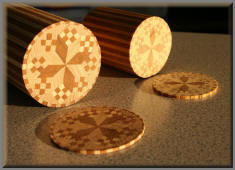
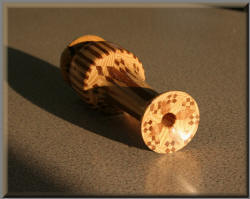
Those small pieces we cut out earlier with the band saw and initially pre-assembled are all then joined together to form one long length with a cross section patterned design as you see there (photos above left (titled: an assembled section & the component parts) or top row right (titled: 8 x 45° strips glued into pattern)) which are all glued together in the aforementioned pattern design formation and left like so in one single solid piece. You don’t want the piece of finished wood to be any longer than roughly six inches as that should be an ample length for your needs, because ultimately you are going to be cutting off one eighth inch thick slices from the end each time and you will have loads of these pieces for your work, in fact, from a six inch length of Tunbridge Ware design stock you will end up with 48 one eighth of an inch thick slices. I would advise you at this point to use squared graph paper to make up your pattern design and then use a reference key to get your wood colours correct when assembling the various six inch lengths into the design pattern for your Tunbridge Ware stock piece. I am only using a squared cross section shaped design here, but you can make diamonds or oblong designs, please yourself, but if you want to do round ones like Stan has done here, you will need the services of a lathe to round it off, but there’s no reason why you can’t use a pattern like this squared one (see photo on right on line above (titled: the final design drawn out on squared graph paper)) where I’ve used light walnut, oak, sycamore, dark walnut and sapele. So there you have an ideal pattern, but do remember that this is the end grain – the same as you are looking at there in our examples (see photos below (titled: view 2, round section, closer view)) that’s the end grain of the piece, but once again, we are not using veneers for the Tunbridge Ware work, we are using solid timbers – that’s the only exception to bear in mind. When you’ve
got all those long thin section pieces arranged into your design
pattern and then glued and bound together you will, or should,
end up with this kind of end result (see photos below (titled:
view 2, round section, closer view)) which is no more than all
those long thin pieces we cut on the band saw glued together and
now, at last, you can see your design pattern forming – of
course, if you wanted it as a round or tubular piece you would
put the assembly on the lathe and finish it off properly. |
|||||||
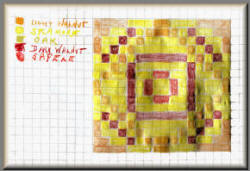 The final design drawn out on squared graph paper |
 View 2 of assembled & separate lengths |
||||||
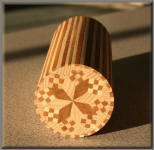 A round section piece |
 Closer view of the square sectioned assembly |
||||||
|
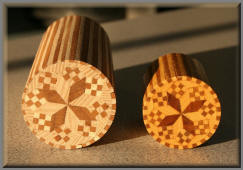
You would then put this finished assembly or piece on the band saw and slice off one eighth of an inch thick slices from that actual piece – and there we have one of those slices that has been cut off from the main piece (see photos below (titled: closer view of 1/8th inch slices, 1/8th inch thick slices cut from block)) so, you can tell how many slices you would eventually get from that main assembly. An observation from the audience at this point: “of course the object would be that you can get repeat patterns” Ah yes well that was the original idea of it, they started
realising that identical patterns could be cut off from the main
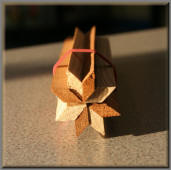
piece or assembly without any further ado. Now, do you have any questions on this subject so far? “Yes, how would you clamp the pieces together?” Yes, well you put them together like so (see photos top row (titled: separated pieces and joined in a V shape, 8 x 45° strips glued into pattern)) and you use white glue to bond them and they will hold together in the pattern you have chosen “How do you hold it all together so that it retains the pattern while the glue sets?” You put some elastic bands round it – or some gummed tape to
hold it in position whilst the white glue sets – lets ask Stan
how he does it, “I don’t do anything different really, elastic bands work very well” So, there you are then, that’s the best way to do it, just stick them together and make up your four pieces, or as many pieces as you want and hold them in shape using elastic bands or tape, alright? Have you any other questions? “How do you manage to cut those pieces so accurately on a band saw?” Stan, John wants to know how you cut those pieces using your band saw “Well you set your fence up and tilt the table to the angle that you need, which in this case is a sixty degree angle, and cut the lengths of wood to one quarter of an inch thickness as you see in these examples” Thanks Stan, okay then any other questions? “When cutting with a band saw, does that give a clean enough finish, would the band saw leave the cut surface smooth enough?” “It all depends on how slowly you go through and the quality of the band saw blade” Stan tells me that all this banding you can see around the outside of this round piece, well he actually laid each piece on individually and taped it up, and then once the glue was set he put it up on his lathe and finished it off to produce this rounded Tunbridge Ware stock. |
|||||||
|
|||||||
|
|||||||
|
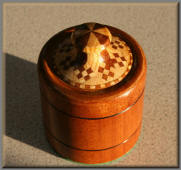
It is actually in the capabilities of all of us to do this type of work – (a wry comment from the audience): “I haven’t got a lathe machine like Stan has to do that kind of work!” – Yes indeed, but you could still make square patterns instead! I remember going to Art Veneers at Mildenhall one year and the store-man told me that they used to make their own banding up there at Mildenhall and they used to start with blocks about one metre long and cut it on a guillotine at one eighth of an inch wide or whatever they wanted. I think it was for a limited pattern to what they usually made. “You can buy it you know, Tunbridge Ware, in strips” Can you? “Oh yes, it’s sold for applying to boxes and things – or the edges of a picture, that kind of thing” The museum at Tunbridge Wells has got loads of exhibits of Tunbridge Ware you may like to see – although I don’t think there are any examples of the man we talked about earlier, Jordan’s work – in fact I don’t think there is any of it about at all because it was all rather mosaic work instead of Tunbridge Ware until this apprentice got involved.
|
|||||||
| Tutorials Menu | |||||||