RMG Shield logo Redbridge Group Header Logo RMG Shield logo
Marquetry Donkey Saw

Adapted from a design by O. Bryan Morland first published in "The Marquetarian" issue 101

Component parts 4
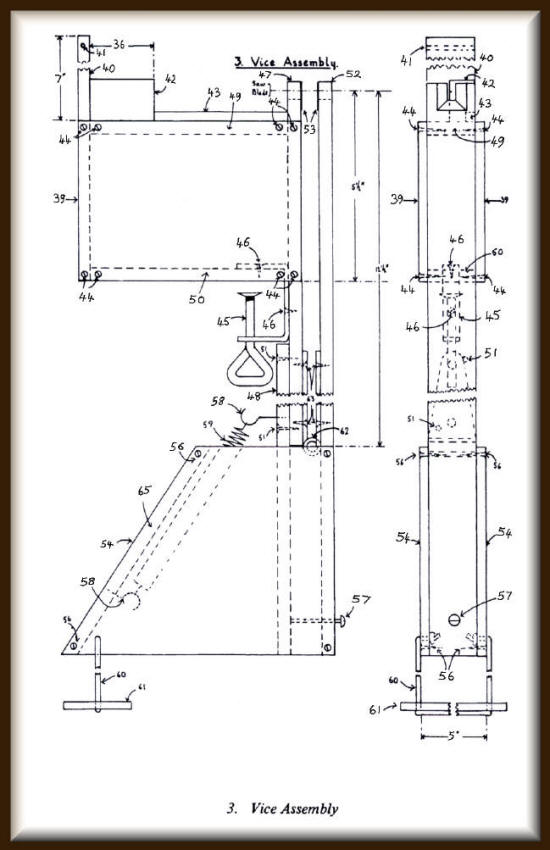
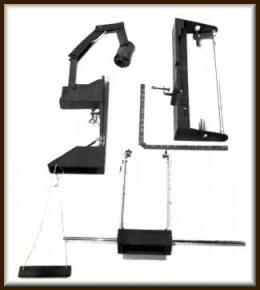
The component parts of the donkey saw
Using the finished donkey saw 4
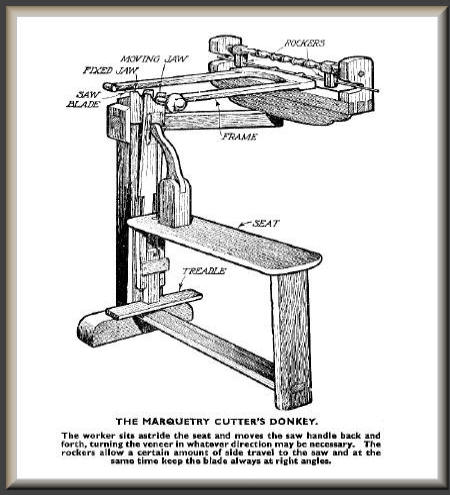
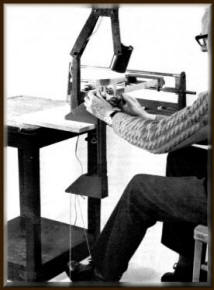
O. Byron Morland using his donkey saw

REQUIREMENTS FOR THE DONKEY SAW
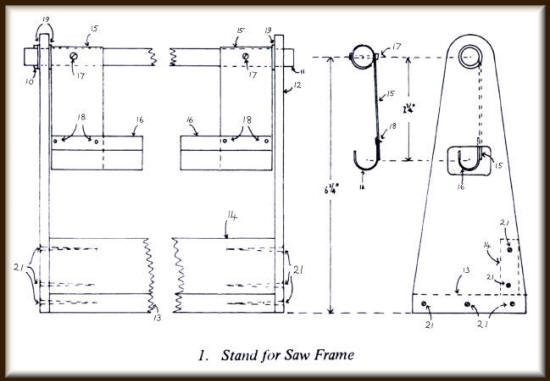
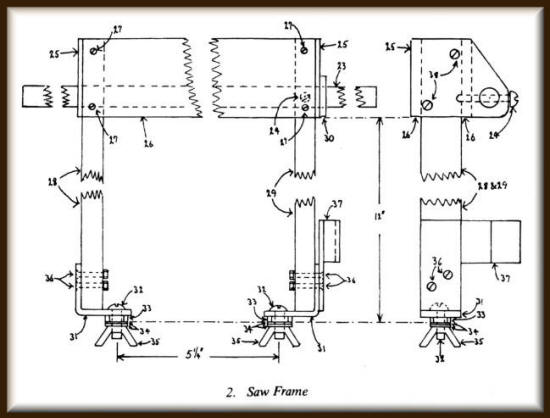
  • The saw blade must be able to float unimpeded from left to right

  • Ditto - upwards and downwards

  • Backward and forward movement:
    (i) angle of cut must be adjustable
    (ii) minimal variation in direction of movement should be obtained

  • Saw blade must be quickly and accurately fixed in and removed from the saw frame

  • Entire apparatus must:
    (i) be as compact as possible
    (ii) be capable of quick set up time when required for use
    (iii) make full use of equipment already available in an ordinary
    household

  • (i) apparatus must be made from readily available and inexpensive
    materials
    (ii) construction must be within the capabilities of an average handyman


Illustration 1 the stand 4
Illustration 2 the saw frame 4 
Illustration 3 the vice assembly 4 
The illustrations above are copies of Mr O. Byron Morland's drawings as originally published in "The Marquetarian" magazine number 101 dated winter 1977.

Unfortunately in the original article there were no construction details published alongside the illustrations, but, we hope, that the illustrations along with the "parts list" as shown below should provide enough information to allow you to construct a donkey saw as seen in the 'top of the page' photos.

If you have any problems in constructing the donkey saw and would like an answer to your problem, just send us an e-mail, using our "editorial team" address, and we will get our Alf Murtell to answer your question (Alf is our acknowledged authority on donkey saws).

Below, we are including a copy of the original "parts list". (Don't worry that the list starts at number 11 because that is the way that the original list and article was written, and hopefully it all "came together" in the final 'sort out' and arrangement of the article!)

Please note: Where screws are listed as C/Sk in the list below, The abbreviation refers to "counter sunk" screws.

O/D refers to "outside diameter" - and R/H refers to "round headed".

PARTS LIST

  1. not listed

  2. not listed

  3. not listed

  4. not listed

  5. not listed

  6. not listed

  7. not listed

  8. not listed

  9. not listed

  10. not listed

  11. ⅜ or ½" O/D brass or steel tube 24" long 1 x off

  12. ex ¼" plywood, outside veneers to run vertically 2 x off

  13. ex ½" chip board, or other rigid material (not shown, 2 slots to accommodate saw frame when folded away) 1 x off

  14. ex ½" chip board, or other rigid material 1 x off

  15. ex 1/16" aluminium 2 x off

  16. ex 1/16" aluminium 2 x off
    (15 - 16 can also be constructed from multiply if preferred)

  17. ⅛ x ⅝" nut & bolt 2 x off. (The joint between 11 and 15 must be very rigid)

  18. ¼" screws - hardened, to cut their own threads in the aluminium 4 x off

  19. washers 3 x off

  20. split pin 1 x off

  21. 1½" C/Sk screws 10 x off

  22. (not shown above) "G" cramp (integral or loose) 1 x off

  23. ⅜ or ½" O/D brass or steel tube, 24" long 1 x off

  24. ⅛ x 1¼" R/H screw (not fitted until final adjustment of apparatus) 1 x off

  25. ex ¼" aluminium 2 x off (L & R)

  26. ex ¼" plywood, outer veneers to run long way 2 x off

  27. ¾" C/Sk screws 8 x off

  28. ex ½ x 1" Ramin, back arm of frame 1 x off

  29. ex ½ x 1" Ash, if available, shave down "on the taper" until right 'spring' is achieved 1 x off

  30. ex ⅛" soft rubber, buffer washer 1 x off

  31. ex ⅛" aluminium, bracket of saw blade holder 2 x off (L & R)

  32. ¼ x ¾" R/H bolts 2 x off

  33. ¼" lock nuts 2 x off

  34. ¼" washers 4 x off

  35. ¼" wing nuts 2 x off

  36. x 1" C/Sk bolts, washers & nuts 4 x off

  37. ex ⅛" aluminium, operating handle 1 x off

  38. " C/Sk screws 4 x off

  39. ex ¼" plywood 2 x off

  40. ex 1⅜ x ⅜" Ramin 1 x off

  41. ⅛" hole for attaching lighting (not shown on drawing, but see Nos 62 - 72 below for parts required)

  42. ex ¾" solid or blockboard. This block supports the back of the saw frame when the saw blade is being fitted.
    Dimension ")(" cannot be determined until whole apparatus is finally adjusted 1 x off

  43. ex ¼" Ramin. Prevents saw frame going too low. Do not fix until whole apparatus is finally adjusted 1 x off

  44. ¾" C/Sk screws 16 x off

  45. 2" "G" cramp 1 x off

  46. " C/Sk screws 2 x off

  47. ex 1⅜ x ⅜" Ramin 1 x off

  48. ex 1⅜ x ⅜" Ramin 1 x off

  49. ex 1⅜ x ⅜" Ramin 1 x off

  50. ex 1⅜ x ⅜" Ramin 1 x off

  51. 1½" C/Sk screws 2 x off

  52. ex 1⅜ x ⅜" Ramin 1 x off

  53. ex 1/10 or 3/64" Vulcanised fibre. After fixing with epoxy resin the fibre should be thinned so that pressure is confined to within 1/8th of the ¼ to ½" slot in number 52. 2 x off

  54. ex ¼" plywood 2 x off

  55. 1⅜ x ⅜" Ramin 2 x off

  56. ¾" C/Sk screws 8 x off

  57. missing from original listing

  58. Screw hooks 2 x off

  59. Tension spring. Perhaps from a broken "pop up toaster", if need be an effective spring can be made from curtain wire 1 x off

  60. Nylon cord 1 x off

  61. ex ¼" plywood 1 x off

  62. Strap hinge (an improved variant to the model) 1 x off

  63. ½" C/Sk screws (in the photographs) 4 x off


FURTHER ITEMS NOT SHOWN ON DRAWINGS

  64.   ⅛ x 2" bolt, with washer and nut 1 x off

65.   ⅛" hardboard 1½ x 9" 2 x off

66.   ⅛" hardboard 1½ x 5" 2 x off

67.   ⅛" hardboard 1½ x 7" 1 x off

68.   ⅛ x ½" R/H bolts, with washers and nuts 3 x off

69  . 2½" dia x 4" Tin 1 x off

70.   Switch / lampholder 1 x off

71   15 watt lamp bulb 1 x off

72.   Electric flex 1 x off

73.   Connector 1 x off

74.   13 amp plug (or standard equivalent) 1 x off 
 

CONCLUSION

The first four of the "requirements" for the Donkey Saw as listed at the top of this article have all been incorporated in the design.
The other two "requirements" remaining, are covered below:

  • (i) The entire apparatus will fit into a box 4" x 18" x 25" internal dimensions
    (ii) Setting up time is under one minute
    (iii) The edge of a kitchen table and a chair are required

  • (i) All components should be readily available: if not, suitable alternatives will spring to mind
    (ii) The very best of luck!

And the author further says: Whenever you bust the saw, remember it will be your own silly fault!

-------------------------------------------------------------

Well, we hope you found this article useful. It was based on the design of an 18th century marquetry cutter's donkey saw.

This design of donkey saw would be very helpful to you if you are contemplating using the American style of veneers which are twice the thickness of our UK veneers. The USA veneers are much easier "to work" when using a donkey saw than they are when using a scalpel blade.

For further guidance of the donkey saw techniques, take a look at Silas Kopf's pages where you will see an established practitioner of the craft in action, click this link for a short cut: "Using a donkey saw".

For similar types of "piercing saw" techniques, take a look at our Alf Murtell's tutorial - for a short cut click the following link: "Piercing saw techniques".

-------------------------------------------------------------

donkey_saw_drawing2 
LIne drawing of a variation of the Marquetry Donkey saw
Tutorials Menu