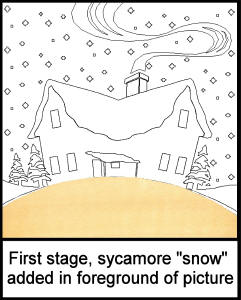
RMG Shield logo Redbridge Group Header Logo RMG Shield logo
Page 4 of Learn with the Redbridge Marquetry Group

The next largest portion of the picture to be cut in (in fact it is the first “cut in” because the snow foreground is actually our waster and thus is already cut in, so to speak) will be the sky veneer. For this purpose and because it is a night time scene with some snow falling,

we need to look for a veneer that will give us as close an approximation to the illusion of a snowy night time sky as is possible with the nature of veneers. My selection for this veneer is Lacewood. This veneer has a nice grain pattern that if selected with a little care can give a reasonable illusion of a snowy night time sky, it won’t be absolutely perfect, but it will give a nice effect.

Now comes the time when you will be making your first tentative marquetry cut for real. If you feel a little wary about making your cut have a practice with some thin card, around about 160 – 200 grams weight card will give you roughly the feel of medium density veneer. When you feel ready to make your cut for real, take your scalpel dip the tip of the blade in a piece of wax to lubricate the cutting point and start making your cut on your waster by following your outline of the sky you previously traced on to your waster

Another important point to make here is that when you are doing your cutting ensure you have your cutting mat underneath the veneer you are cutting otherwise you’ll end up with a terribly scored table and we all know what our others halves think of things like that, if you haven’t got a cutting board try using plenty of sheets of newspaper under your veneer to protect any vulnerable surfaces.
Sycamore snow foreground fig 3

An alternative method for cutting out your veneer pieces (and this method is especially useful when tackling 'hard' veneers) is to "prick out" your cutting line with the tip of your scalpel by following the "line" of your window in your waster onto the "picture veneer" beneath the window so that you end up with a pattern on your "picture veneer" that looks like a 'join the dots' puzzle. This 'join the dots' pattern should perfectly match the window in your waster veneer, if this is the case you can now join the dots with your scalpel and then remove this new insert piece of picture veneer. Once you have cut your insert using this method you will have a perfectly fitting piece of your picture veneer that you can now glue and insert into the vacant window of your waster veneer. (I must admit that I totally forgot about this method of accurately cutting veneer pieces, thanks are due to Alf Murtell for reminding me of this simple and accurate cutting method)

Path redrawn fig 4

As we are using sycamore as our waster veneer you shouldn’t have any problem in making a confident smooth cut in it, this is one of the nicer veneers to work with.

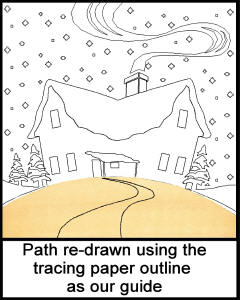
If you didn’t want to attempt cutting around the house and fir trees outlines at this stage you can simply cut around the straight top, left and right outlines and then follow the foreground snow mound, this will then make the Lacewood veneer we are going to insert in this cut out window take over the role of being the waster veneer for this section of the picture, you will get the idea as we go along.

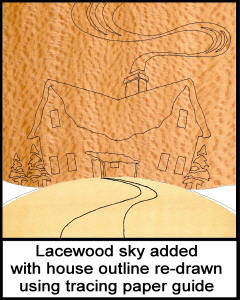
We will assume that you’ve opted for this arrangement and therefore we will now proceed as follows, if you have a look at the illustration you will see that I’ve cut out and removed the sky, house and fir trees from the waster, so what I’ll do now is position my piece of Lacewood under the vacant window in the waster and move it around until I find the most appropriate section of that piece of veneer that will fulfil the role of a snowy night time sky.

Once I’ve located that piece of veneer I loosely tape it in place with some low tack tape (I use “Magic tape” made by Scotch 3 M’s which I think is available near enough everywhere) then, following the edges of the vacant window (or large hole if you prefer) that I previously cut out I closely cut my piece of the Lacewood so that it will fit in the empty window with as much accuracy as my cutting will allow.

Now that you have cut your sky veneer and you are happy that it fits the empty window in your waster veneer you can glue it in place, if you wish you can put some tape over a few of the joins to hold the veneers in place while the glue sets.

Your picture should now look like our illustration. What we need to do now is replace our design outline on our new piece of waster. As we already have our tracing taped to the top of our waster and we have our alignment mark also added to our waster and tracing all we have to do is insert the carbon paper between the tracing paper and the waster, line up the alignment marks and re draw our design onto the new waster veneer.

We follow this process to complete our picture and in doing so we are converting each new piece we cut in, in to a new level of waster veneers, it’s a form of reduction processes until we complete our picture.

What we are doing is cutting windows within windows until we have got down to the last small inserts that will be required for our picture. If you follow our illustration sequence it will become obvious the way this works. Again its time to point out another important consideration here, and that is, to make as much use of the grain orientation of your veneer as you can, this will help mould and shape your picture in much the same way as a painter does with their brush strokes.

Lacewood sky added fig 5

Learn with Redbridge Marquetry Group Page: 1 | 2 | 3 | 4 | 5 | 6