RMG Shield logo Redbridge Group Header Logo RMG Shield logo
Page 5 of Learn with the Redbridge Marquetry Group

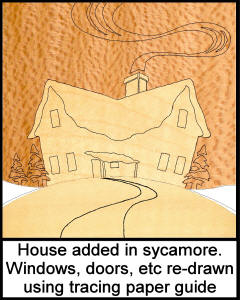
Right, well getting back to our re-drawn design on our Lacewood “waster” veneer, the next piece we are going to insert will be the body and the roof of the house complete with snow.

As snow on the roof is the obvious feature of this house we can make use of some more of the sycamore we first used as our primary waster veneer.
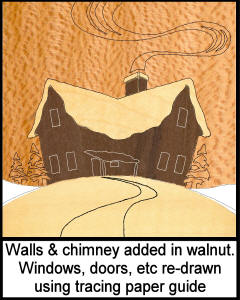
Our next step is to cut out a window in which we can insert our house and snow veneer. So again follow the outline of the house and snow with your scalpel and remove the section from the Lacewood so that you now have an empty window that you can fill with your next veneer.

As before line up your sycamore beneath the empty window and cut out your veneer to fit the vacant space.

Glue and tape the sycamore piece in place and then re-draw your design on to your new waster (the sycamore) in the same manner as you did with the Lacewood you first inserted.


You can now start cutting in the body of the house, for this veneer I am selecting a dark section of Peruvian walnut,

House added in sycamore fig 6
Walls added in walnut fig 7 alhough African or European walnut could also suffice for this purpose, and I will be looking for a fairly uniform dark piece.

This should be reasonably easy to find, as we only need a small piece for this picture. Once again we follow the cutting and marking out arrangements we have already used for the sky and snow sections of our picture.

For the snow lined windows and front porch parts of the house we will revert yet again to our sycamore veneer and for the little fir trees I have elected to use a piece of our sycamore once again which will help to keep our picture harmonious.

For the path and the smoke from the chimney I will be using another easy to cut veneer Magnolia and for the hills left and right I will use a slightly darker piece of our sycamore.

An advantage with magnolia is that you get virtually two veneers in one, as it is an obviously dual coloured veneer, so it gives you the choice of a lighter or darker tone for your picture.

I am going to use the darker part of the magnolia veneer for the smoke and the path.

The cutting and gluing will obviously follow the same procedures we have already used for the earlier parts of the picture.


You will notice that at every stage of the process I've re-drawn my guide lines in order to maintain accuracy for my cutting.

I also ensure that I dip the tip of my scalpel blade into a piece of wax before cutting in order to lubricate the blade and to avoid the blade and veneer "pulling" against each other and tearing the wood fibres instead of cutting it cleanly.

Now, assuming you’ve followed our guidelines and recommendations your picture should now look like the finished version in our illustration on the next page.

You will see that we’ve now got our picture cut and assembled but it is obviously a very fragile and dull looking object at the moment, but never fear, just like a butterfly emerging from it’s chrysalis we will transform our picture in to a very beautiful work of art, and this is how we do it.

Windows etc in sycamore fig 8

Path smoke and hills added fig 9

We obtain a suitably sized piece of M.D.F. to act as our baseboard.

You can if you wish use chip board or block board or ply wood, etc, but for ease of use and stability I don’t think you can really beat M.D.F. in this context, it is a material that was virtually invented for this task, it’s stability alone makes it the ideal candidate.

As this is a 15 x 10cms picture and it is your first marquetry picture, and also assuming at this stage that adding borders would over complicate the procedure,

I would make the baseboard the same size as the picture (if the edges are accurate) or if there is any inconsistencies I would make the baseboard slightly under the size of the picture and give myself the opportunity to “sand” down the over lapping edges of the picture to fit the baseboard
.
Learn with Redbridge Marquetry Group Page: 1 | 2 | 3 | 4 | 5 | 6